One of my friends wanted to learn entity framework and requested
me for a running sample of entity framework file.
Here I am writing an entity framework sample application
to demonstrate the whole idea of entity and we can check how powerful it is
while we walk through the sample.
Before starting with application part, I have already one
DB “Test_DB” which I will use in this sample application.
You can check I have three tables in the DB to check the
relationship between tables let’s see the DB diagram for this DB.
Here you can check “tb_Section” and “tb_Class” are referenced in
table “tb_Student”. (One thing you should make sure that table should be
properly referenced if you wanted to make full and powerful use of Entity
Framework).
So our DB is ready now let’s starting with our application.
Open Visual Studio and add Blank Solution and name it as “TestApplication”.
After that add new ASP.Net Application project to this
solution and name it as “TA.Portal”. Visual Studio created the default application with master page, some other pages, style class and scripting files.
I have modified the Default.aspx and site.master file and removed
all other pages as we don’t require those pages for our sample.
We're done with basic modification, run the Test Application to see output:
So application is created and running fine. Now add new ClassLibrary project (in
which we will write code related to DB access, though we can add our DB access
code in our application project itself, but best practices always says that DB
classes should stay in different project) and name it as “TA.ClassLibrary”.
So now both project are created and build successfully. Now add one directory (and name it DB) under ClassLibrary project.
Our startup is ready let’s walkthrough the sample now.
Right click on DB directory and click on Add New Item and Select
ADO.Net Entity Model and name it as TAModel.edmx and
click on Add.
Next window appears asking for Model Contents with two
options Generate from database or Empty Model. Select Generate from database
and click on Next.
Choose your Data Connection screen appears here click on New
Connection.
New connection screen occurs; Select your server name and then
Select DB name. You can Test your Connection by clicking on Test
Connection. Once done with connection click OK.
Verify the connection and click on Next.
Entity Data Model Wizard screen appears, Select the
tables/View/SP you wanted to use on you EDMX file. I have changed the
Model namespace and named it as TestEntities. (If you want you can
use same model namespace also). Once you have selected required objects click
on Finish.
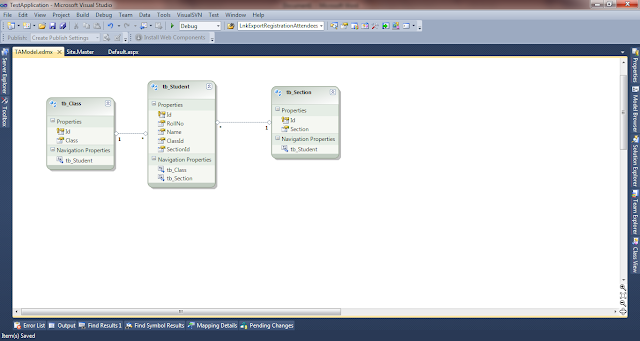
We are done and our entity file is ready to use. Have a
look on our entity file here.
Connection String of this file is saved in newly added App.Config
file. Later on I’ll demonstrate how we will change this connection string with
Portal connection string for all our DB interaction.
Now create one
Controller class where we will add all our CRUD methods, and implement IDisposable
Interface on this class so our Controller class looks like:
In Controller class I have added two private members as:
private readonly
EntityConnection _entityConnection;
private
readonly Test_DBEntities
_modelContext;
|
And initialize these variables in Controller constructor as:
/// <summary>
/// Constructor
/// </summary>
public
Controller()
{
_entityConnection = new EntityConnection(entityBuilder.ToString());
_modelContext = new Test_DBEntities(_entityConnection);
}
|
So now Entity Connection and object of entity file is ready to use. But before we moving ahead keeping my promise I am here demonstrate how we will use the Portal Connection String defined in Web.config file of Portal project.
First of all I have defined connection string in Web.config
(under Configuration section) as:
<connectionStrings>
<add name="PortalConnectionString"
connectionString="Data
Source=localhost;Initial Catalog=Test_DB;
Integrated
Security=True"
providerName="System.Data.SqlClient" />
</connectionStrings>
|
Now in the Constructor of Controller class I have written
the following code to use connection string defined in Web.config.
var
connectionStringProvider = ConfigurationManager.ConnectionStrings["PortalConnectionString"];
var
entityBuilder = new EntityConnectionStringBuilder
{
Provider =
connectionStringProvider.ProviderName,
ProviderConnectionString =
String.Format("{0};MultipleActiveResultSets=True", connectionStringProvider.ConnectionString),
Metadata = "res://*/DB.TAModel.csdl|res://*/DB.TAModel.ssdl|res://*/DB.TAModel.msl"
};
|
Let me tell what I have done here: I have fetched the connection
string and created new Entity connection string from that connection string.
Main point is to note here is Metadata, this is entity metadata (for every
entity model it is different) and I have copied this from App.config file.
So our controller is now ready to fetch data from DB. Before
we query to objects have a look at our controller class now.
So to use controller object on our pages we are using dependency injection(DI) to handle the object, and for this we need “StructureMap.dll”, so I
have added Library folder under main TestApplication
folder and put this dll in the library folder to use it in this project. Then I
have referenced this dll in ClassLibrary project by clicking on Add Reference
and then browse to the Library project to add reference.
After reference is added, now let’s create one class under
ClassLibrary project and name it as StructuremapRegistry (ref: below
screenshot), and add following line of code in StructuremapRegistry constructor.
For<Controller>().Use<Controller>();
|
So we have passed almost all the hurdles here and now wanted
to see some output through this sample.
So let’s show the list of students with Class and section
etc. To get list of student add following method in your controller class:
/// <summary>
/// Get All Students.
/// </summary>
/// <returns></returns>
public
IEnumerable<tb_Student>
GetAllStudents()
{
return
_modelContext.tb_Student;
}
|
Method to get list is
ready and now comeback to the Portal application.
First of all add reference to ClassLibrary project and StructureMap.dll(as
we did in ClassLibrary project), and create one User Control in our portal
application and add a Gridview there which will show the list of students from “tb_Student”
table, and add required column to be shown in the list, controls markup is
looks like:
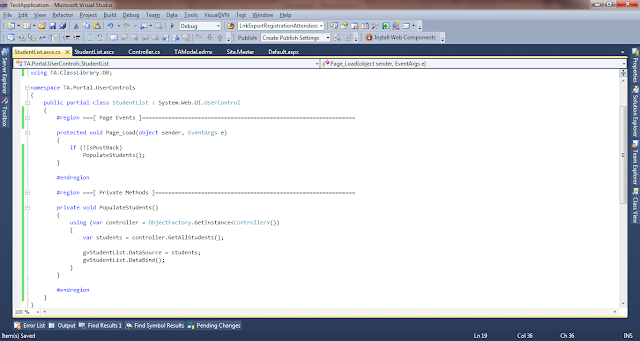
On the code behind (StudentList.ascx.cs) add new method and
call it on Page_Load.
So we are done just put this user control on our Default
page and then run the application and see result of our hard work. Yey its
working see result here.
Hope you have enjoyed this sample if you need more help then post here.
Happy Programming!!!


hey dude, thanks for a nice post to understand EF with dependency injection but in my case i have used WCFWebextensions inspite of structureMAp.dll but overall too good :-)
ReplyDelete